

On this page
Smart preparation and efficient looting routes in SAND: Raiders of Sophie can cut your progression time significantly compared to winging every run. This guide shows you how to streamline your loadouts, farm Crowns faster, spend Tech Tree resources wisely, and extract more value from every expedition without burning hours on low-yield tasks.
TL;DR
- Load your weapons and cannons the moment you spawn—use Tab to transfer full ammo stacks, not one shell at a time
- Focus on Voyage mode first to learn routes and loot safely without time pressure
- Prioritize Radio Beacon Boxes (2,000 Crowns each) and Raw Aurogen Crystals (500 each) for fast money
- Unlock Tech Tree storage and power nodes before expensive weapons—they improve every run
- Hit small shipwrecks and safes instead of contested big landmarks to extract more often
What Makes SAND: Raiders of Sophie Grindy
SAND: Raiders of Sophie is a PvPvE extraction shooter from developers Hologryph and TowerHaus, published by tinyBuild, where Raiders pilot customizable Trampler vehicles across desert wastes, scavenge loot, fight rivals, and extract before losing everything. The grind hits players in three places: nothing spawns loaded—your guns and cannons appear in a green box and your first job on every drop is to get it all combat-ready before you start driving, Tech Tree upgrades require additional crafting resources apart from Crowns to unlock, and you lose all extracted loot if you die before reaching an evacuation point. Most early-game frustration comes from wasted runs—spending twenty minutes looting only to lose it all because you chased one more crate or fumbled your loadout prep. The difference between efficient players and those stuck repeating the same mistakes is knowing which tasks actually move the needle and which ones drain time for minimal reward.
Players short on time can put SAND: Raiders of Sophie boosting alongside a normal playthrough rather than in place of one.
Where the Time-Waste Happens in SAND: Raiders of Sophie
Loading is the bit beginners fumble, and it’s the single most important mechanic to grasp. Your character can only carry a shell or two at a time, so don’t load cannons round by round—instead, pick up the cannon kit or stand at the storage box, hold tab, and transfer the whole stack of ammo straight into it. Drop a couple of cans of food in the fridge so you can respawn quickly, and slot a fuel rod into the engine. This five-minute setup ritual every single drop adds up to hours over a week. The second drain is looting greed: big, named points of interest are tempting because they look richer, but they’re magnets for players, and someone better equipped or rolling in a squad will often turn up—if you specifically need the rare loot a big POI holds, the move is to let others clear it and then fight them for it. The third is blind Tech Tree spending—the mistake most players make is unlocking random nodes just because they are cheap; early Crowns and materials are limited, so your first upgrades should improve extraction consistency.
Step-by-Step: Efficient Run Preparation
Follow this sequence to get it done fast.
-
1
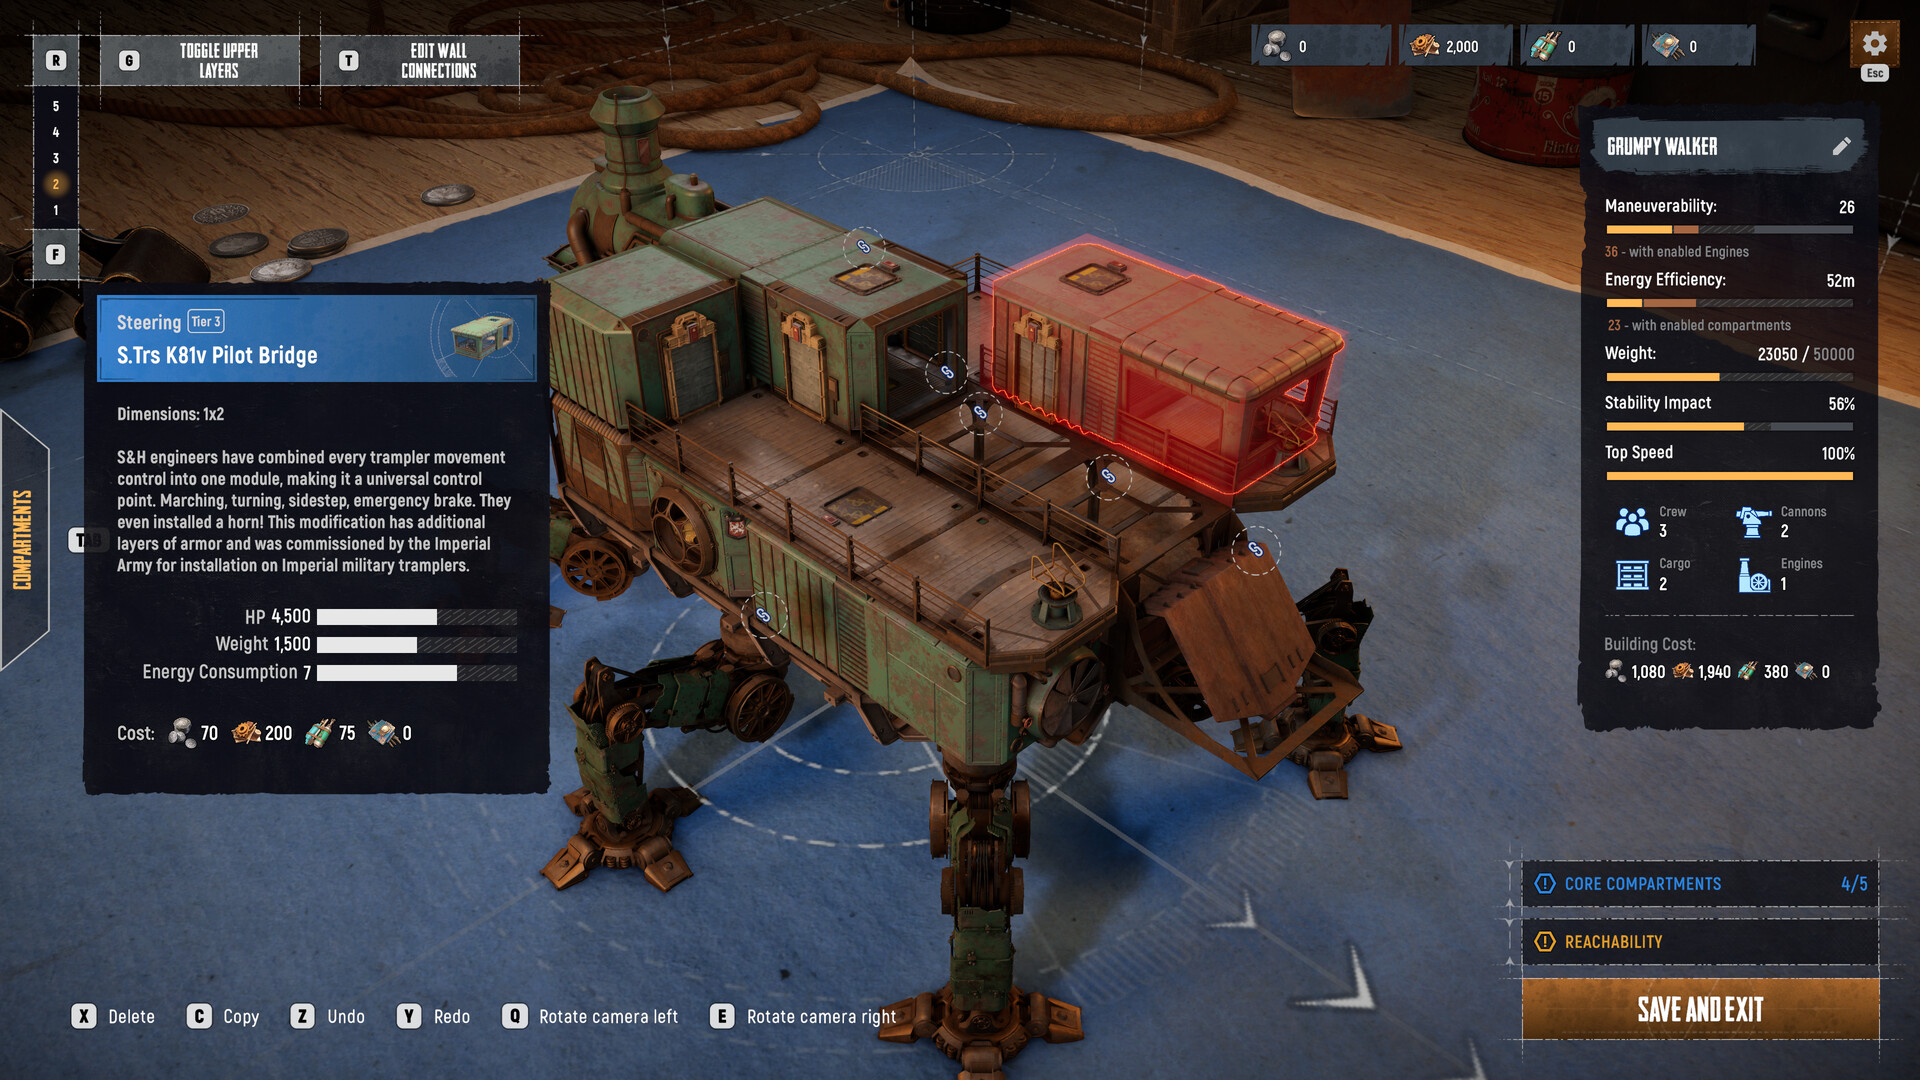
Pick the Grumpy Walker preset early
It doesn't require that many resources to reconstruct, so even if it gets destroyed in your expeditions, you're really not losing out on a lot of resources, and it has really balanced stats for your early game.
-
2
Load everything before moving
The instant you land, everything you're carrying is unloaded—pick up the cannon kit or stand next to a storage crate, hold down the Tab key to load the entire set of ammunition directly, and then hold down the F key to drag the loaded cannon to the turret slot on the trampler.
-
3
Stock food and fuel immediately
Always start a run with some food and place it inside the refrigerator when you spawn in so that it allows you to respawn; fuel rods keep your reactor running.
-
4
Power down at every stop
Whenever you stop at a landmark to scavenge, manually flip the power switch back off—this prevents your internal battery from draining and cuts the thick chimney smoke, which acts as a massive visual beacon for rival raiders across the map.
-
5
Carry a green loot box on foot
You'll need to make a habit of carrying a green empty box with you whenever you go out to grab loot from a destroyed trampler or an unexplored location—you can find empty boxes inside the refrigerator of your trampler.
-
6
Extract early, not greedy
If you're solo, don't get greedy—once you've got what you came for, extract.
Best Crown Farming Methods (Time vs Reward)
Warning
Radio Beacon Boxes have a two-hour timer before they expire—keep an eye on the clock and extract before you lose the stack.
| Method | Payout | Time per Run | Best For |
|---|---|---|---|
| Radio Beacon Boxes | 2,000 Crowns each | 10-15 min per box | Stacking 3-4 per Voyage run for big payouts |
| Raw Aurogen Crystals | 500 Crowns each | 2-3 min per deposit | Quick side income, multiple deposits cluster together |
| Safes at landmarks | Around 200 Crowns + sellable loot | 1-2 min per safe | Low risk, steady passive income every POI visit |
| Shipwreck chains | Variable (materials + valuables) | 5-10 min for 3-4 wrecks | Small points of interest with light PvE—you expose yourself less, you loot faster |
| Buried bones with shovel | Variable treasure | 3-5 min per dig | Off the obvious routes; the shovel's a one-time use, but the payoff makes it worthwhile |
What to Unlock First in the Tech Tree (Efficiency Path)
The Tech Tree in Sand: Raiders of Sophie is divided into three different skill trees: Kaiser’s Friends, K.K. Landwehr, and Godlewski’s Expedition. Focus on storage, power, crew support, and one reliable weapon path first, then move into armor, larger chassis options, and advanced cannons later—the Tech Tree is split across Godlewski’s Expedition, K.K. Landwehr, and Kaiser’s Friends, with upgrades spread across four tiers.
Priority 1: Storage and Power (Godlewski’s Expedition)
Godlewski’s Expedition focuses on power generation, medical equipment, crew facilities and advanced structural components—players looking to create larger and more efficient Tramplers should prioritize this branch. Storage and power upgrades give better value because they improve every run. Start with the Motor-Reactor and Cargo Deck unlocks—these let you stay out longer and haul more loot per trip.
Priority 2: Basic Weapons and Armor (K.K. Landwehr)
If your approach to survival centers on withstanding intense bombardment and excelling in close-range ship engagements, K.K. Landwehr is the tree to prioritize—this contractor focuses exclusively on ballistic protection, ammunition production and specialized equipment designed for breaching operations. Don’t rush Tier IV weapons yet; your early upgrades should help you survive, loot, and extract—do not rush expensive weapons if your Trampler cannot carry loot or support basic combat.
Priority 3: Crew Room and Utility (Kaiser’s Friends)
Crew Room: Unlock this early if you play with friends or want better Trampler support—it is one of the cheapest important upgrades and helps larger builds make sense. This branch covers storage expansion and utility modules that reduce downtime between runs.
Smart Looting: What to Grab, What to Skip
Loot mostly comes in coloured crates, and the colour tells you the quality—brown is common, green is a step up, and red is the good stuff: rare weapons, tools and utility parts. The crates also carry a little drawing on top: a cogwheel for utility parts, a weapon, or a cannon. Always prioritize red crates, then green. Scrap Metal and Scrapped Ammo are the backbone of K.K. Landwehr progression; Fabric Scraps, Threads, and Metal Rods drive Kaiser’s Friends upgrades; Alloy Steel appears in mid-to-high tier upgrades across all three factions. Ficus and Crystal are Tier IV gatekeepers—you will not reach the top of any faction’s tree without them. Don’t grab everything blindly—when you’re eyeing the tech tree, hover over the upgrades you’re working towards even if they’re a way off; that tells you which resources to start hoarding with purpose, so you’re not grabbing everything blindly.
Voyage vs Storm Dive: Which Mode Saves Time
Two modes are available right now: Storm Dive and Voyage—Storm Dive is a battle royale format where a shrinking ring steadily cuts off the map, putting constant pressure on your position and resources; Voyage, on the other hand, lets you explore the map freely with no ring closing in. Voyage Mode in SAND Raiders of Sophie removes the shrinking storm mechanic, giving you unlimited time to explore, scavenge, and learn the map layout—this is where you should spend your first 10 to 15 hours in the game; use Voyage Mode to memorize extraction points, practice Trampler handling, learn Upior attack patterns, and experiment with weapon mounts without the pressure of an encroaching storm; the loot is not as valuable as what you find in Storm Dive, but the knowledge you gain is worth far more. Voyage is the mode to farm in—it has no shrinking circle and no run timer, so you can clear loot at your own pace and keep the pressure low.
For players looking to understand early-game systems better, check out the 5 beginner mistakes that cost you loot guide.
Common Misconceptions About Grinding in SAND: Raiders of Sophie
Myth: You Need to Fight Every Trampler You See
Always advise shooting off the legs of the opponent’s trampler to immobilize it and give you the advantage—this will allow you to target them from wherever you want, and targeting the legs allows you to spare the captain’s crew room in case you want to seize control of the enemy trampler. But fighting isn’t mandatory—early on, efficiency beats ambition: hit the small points of interest with light PvE, and move boat to boat; you expose yourself less, you loot faster, and the haul adds up surprisingly quickly. Avoiding big fights means more successful extractions and steadier income.
Myth: Big Landmarks Are Always Worth the Risk
If you’re in hostile lobbies and get attacked while looting bigger landmarks, why not check out the Shipwrecks and start small—the desert of Sophie is littered with shipwrecks as far as the eye can see; instead of heading for the larger POIs on the map, focus on clearing out these shipwrecks; you’ll find resources like ammo for cannons, fabrics, threads, weapons, and even valuables. Shipwrecks are quieter, faster, and let you stack multiple extractions instead of losing everything in one PvP fight.
Myth: You Can Craft Better Gear Back at Base
Get a workbench onto your trampler as early as you can—it lets you craft extra ammo and upgraded gear mid-run, which means you can turn a pile of raw loot into exactly what you need on the spot rather than waiting until you’re back in the menu (you can’t craft there); it’s a great way to consolidate a messy haul, too. Crafting happens on your Trampler, not in the lobby—plan accordingly.
Tip
Raw Aurogen Crystals are radioactive and will steadily drain your health while you’re carrying them—store them on your Trampler as soon as possible to avoid unnecessary damage.
Our Take: Is the Grind Worth It
Our Take
SAND: Raiders of Sophie respects your time if you respect its systems—but only if you learn them fast.
The grind exists, but it’s not artificial padding. Early progression follows a simple pattern: deploy with a budget Trampler, scavenge surface-level ruins, extract with modest loot, upgrade components gradually, then attempt riskier targets. The game punishes blind repetition and rewards route planning, loadout discipline, and knowing when to extract versus when to push. Players who spend their first ten hours in Voyage mode learning the map, identifying which landmarks are worth the risk, and building a reserve of mechanical parts and Crowns will progress twice as fast as those who keep dying in Storm Dive with nothing to show for it.
The real time-sink isn’t the loot grind—it’s losing runs to avoidable mistakes. Defence wins these brawls as much as offence; the longer your trampler stays healthy, the longer you last, and these fights are often won by attrition—a classic Sand standoff is two crippled tramplers slowly circling each other, and the one who kept repairing is the one that limps away. Repair discipline, smart extraction timing, and not chasing one more crate when you’re already loaded are the skills that separate efficient players from the ones stuck in the loop. The Tech Tree costs look steep until you realize Radio Beacon Boxes fund three nodes per successful Voyage run. If you’re feeling stuck, the issue is almost always extraction rate, not loot availability.
For a deeper dive into early priorities, see the fast leveling and progression guide and first shop purchases worth making.
Was this guide useful?